Prelude to Swift 3 Migration
If you didn’t migrate to Swift 3 in September like the rest of us, do it now and start next year off right. If you’ve been holding off on making the update, here is some advice and guidance to ensure a safe and swift transition to the next version.
Migrating to Swift 3 can seem a bit daunting depending on the size of the project, but with the proper steps and procedures you should be able to get through it much sooner than later. Xcode 8.2 will be the last version to support Swift 2.3, and that in itself is an incentive to start the migration as soon as possible.
All the major changes to Swift 3 can be found on the Swift 3 site.
Xcode 8 has a built-in Swift migration tool that is there to help automate the transition. Before you use this tool there are some important things to consider.
- Make sure all of your tests are passing and that your project compiles properly
- Ensure any 3rd party libraries are ready for Swift 3
- If you are using CocoaPods you’ll want to check to see if they have been updated to Swift 3.
- Per the Swift Migration Guide, if you don’t have a scheme that builds all the targets, it’s recommended you do so.
Running the Migrator
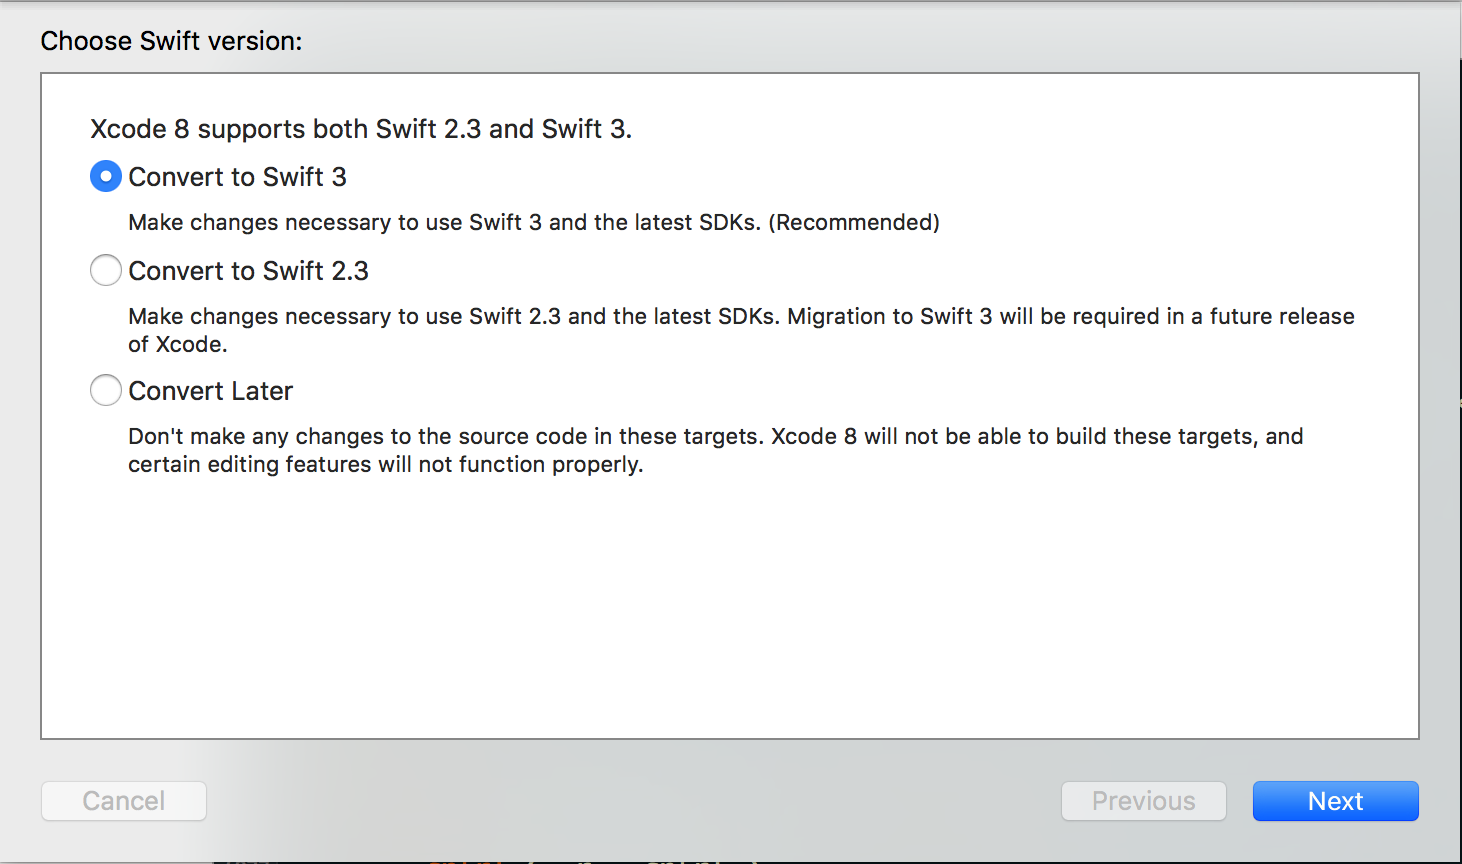
The first step to beginning the Swift 3 migration process is to start the Migrator.
When you first launch a Swift 2.2 project in Xcode 8, you’ll get prompted to run the migrator. If you’ve already updated to Swift 2.3 you will need to go to Edit > Convert > To Current Swift Syntax…

From there select Convert to Swift 3, select your schemes, and complete the steps in the assistant migrator..
Swift 3 Migration Complete?
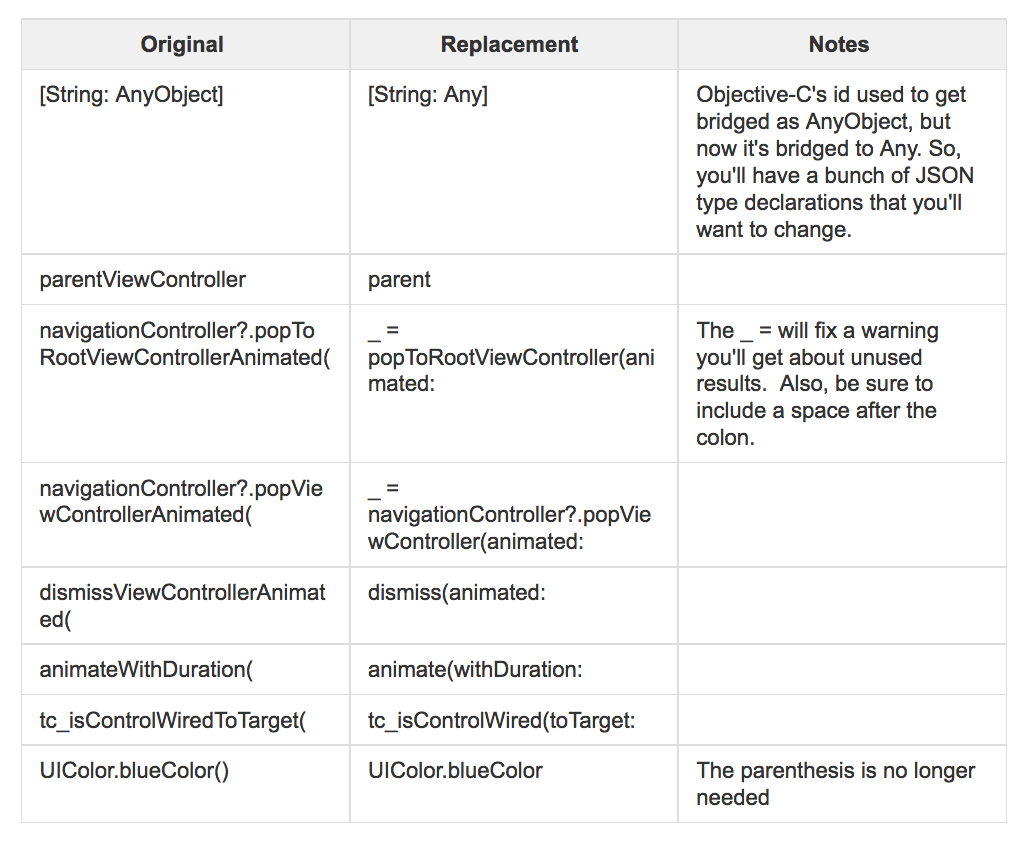
The migrator is not perfect and there will most likely be some errors and warnings that you’ll need to go through and resolve manually.
Something to remember is there is a lot of repeat among what the migrator missed – using “Find and Replace” will help reduce the time it takes for those repetitive changes.
Private & FilePrivate
The first thing you’ll want to do is replace “fileprivate” with “private”. Swift 3’s fileprivate has the same semantics of the old private access modifier, so the migrator changes all original instances of private to fileprivate. However, most of the time private is what you actually want. It’s more restrictive than fileprivate so it’s better to default to using private and then only use fileprivate when necessary. The compiler will point out areas where you’ll need to change something from private to fileprivate.
Public vs Open
Openclasses are accessible, subclassable and overridable outside of the defining module.Publicclasses are accessible but not subclassable or overridable outside of the defining module.
It’s preferable to be restrictive where applicable when using these methods, if your class conforms to public and doesn’t need to be subclassed or overridden outside of the module then I would stick to public, otherwise use open where necessary.
Open access is the highest and least restrictive access level, and private is the most restrictive. Read more on Apple’s Developer Site.
Unused Results Warning
If you have a method that returns a value, but that value is unused – you will get this warning. Try one of the fixes below.
- Add “@discardableResult” in front of the function declaration if that function’s return value is of secondary importance. For example, if you have a method that makes a network request and returns the associated URLSessionDataTask, the side effect of actually sending the network request is really the primary purpose of the method. In this case, it makes sense to mark the method with @discarableResult
- If you’re calling a method simply for the method’s side effects even though the primary purpose of the method is to return a value, then you shouldn’t add @discardableResult to the method. Instead, assign the return value to an underscore. This makes it clear that you are aware that the method returns a value but that you are only calling the method for its side effects:
Code: ‘ _ = someMethodThatReturnsSomething()’
Other Common Errors
Below are some other common items that you can find and replace if the migrator missed it. These are just a few examples. When you start making updates, you’ll come across other cases that you could use find and replace for as well.
String Enums
If you have any string enums that don’t have explicitly assigned string literals for the cases, then the rawValue will be exactly how the case is spelled. In Swift 3 the cases start with a lowercase letter–this means your rawValues have changed. For these enums, you’ll need to make sure that you’re not expecting the rawValue to start with a capital letter.
Just to be clear, if you originally had:
enum MyEnum: String {
case MyCase
}
You’ll now have:
enum MyEnum: String {
case myCase
}
The important thing to keep in mind is that the rawValues are different:
// Pre-Swift 3:
MyEnum.MyCase.rawValue // => "MyCase"
// Swift 3:
MyEnum.myCase.rawValue // => "myCase"
Method Parameters
In Swift 2.2 our first parameter in a function could be optional, after migrating to Swift 3 that is no longer the case. Each parameter is required to be specified, you can see an example of this below:
// Pre-Swift 3:
func numberOfSectionsInTableView(tableView: tableView) -> Int
NSTimer.scheduledTimerWithTimeInterval(1, target: self, selector:#selector(kitchenTimer) ,userInfo: nil, repeats: false)
// Swift 3:
func numberOfSections(in tableView: tableView) -> Int
Timer.scheduledTimer(timeInterval: 1, target: self, selector:#selector(kitchenTimer), userInfo: nil, repeats: false)
Incorrectly Migrated OptionSet Types
The migrator may have failed to migrate places where OptionSets are used. For example, you may have had:
UIView.animateWithDuration(1.0, delay: 0.0, options: .CurveEaseInOut, animations: { ... }, completion: nil)
The migrator might have botched the options like this:
UIView.animate(withDuration: 1.0, delay: 0.0, options: UIViewAnimationOptions(), animations: { ... }, completion: nil)
To keep the CurveEaseOut option you can use:
.curveEaseOut
Comparable and Optionals
You might notice a few files where this is at the top of the page:
private func < <T: Comparable>(lhs: T?, rhs: T?) -> Bool {
switch (lhs, rhs) {
case let (l?, r?):
return l < r
case (nil, _?):
return true
default:
return false
}
}
This is a generic implementation of the “<” operator for use with comparing types that conform to the Comparable protocol. It makes Comparable have the same semantics that it used to have. Now, if you want to compare optional Comparable types, you’ll need to provide your own implementation for it.
To illustrate this change, you may have had something like this:
struct Person: Comparable {
let name: String
}
let person1: Person = Person(name: "Bob")
let person2: Person? = Person(name: "Will")
if person1 < person2 {
}
This comparison used to work just fine, though it’s not clear what the result would be if person2 were nil. In Swift 3, the code above wouldn’t compile because < isn’t defined for comparing optionals. Now, you’ll have to unwrap the optional to compare it or you’ll need to define your own behavior for < with optionals.
Additional Changes
There might be more changes that you run into when migrating. When this happens, a good resource is listed below under the official Swift Migration Guide – there you can find information on the library, known migration issues, and information on each update to the Swift language.
New Required Plist Keys in iOS 10
The iOS 10 SDK now requires a few usage description keys for things like accessing the camera or microphone. These usage descriptions are displayed to the user when they are prompted to either accept/deny access. If a key isn’t set, for example to access the microphone, the app will crash when it attempts to access that specific API.
I’ve listed some common ones below:
- Bluetooth Sharing – NSBluetoothPeripheralUsageDescription
- Calendar – NSCalendarsUsageDescription
- CallKit – NSVoIPUsageDescription
- Camera – NSCameraUsageDescription
- Contacts – NSContactsUsageDescription
- Health – NSHealthShareUsageDescription & NSHealthUpdateUsageDescription
- HomeKit – NSHomeKitUsageDescription
- Location – NSLocationUsageDescription, NSLocationAlwaysUsageDescription, NSLocationWhenInUseUsageDescription
- Media Library – NSAppleMusicUsageDescription
- Microphone – NSMicrophoneUsageDescription
- Motion – NSMotionUsageDescription
- Photos – NSPhotoLibraryUsageDescription
- Reminders – NSRemindersUsageDescription
- Speech Recognition – NSSpeechRecognitionUsageDescription
- SiriKit – NSSiriUsageDescription
- TV Provider – NSVideoSubscriberAccountUsageDescription
Overall migrating to Swift 3 should be made easy by the migrator. Having your unit and UI tests passing and properly testing your code will be key to ensuring that your project stays consistent after the migration. Once the migrator is complete, make sure you go through any errors you have with the help of this guide or, if it’s not listed above, check with the additional resources below.
Additional Resources
https://swift.org/migration-guide/
https://swift.org/documentation/api-design-guidelines/
WWDC Session – What’s New in Swift
WWDC Session – Swift API Design Guidelines
Info Plist Cocoa Keys
Github Swift 3 accepted proposals