The Apple Watch is nearly here, and if you haven’t started working with WatchKit, you’re behind. Luckily, Apple has made it fairly simple to dive into Apple Watch development. However, you may run across a few surprises and snags as you start to get your feet wet.
Watch Counter
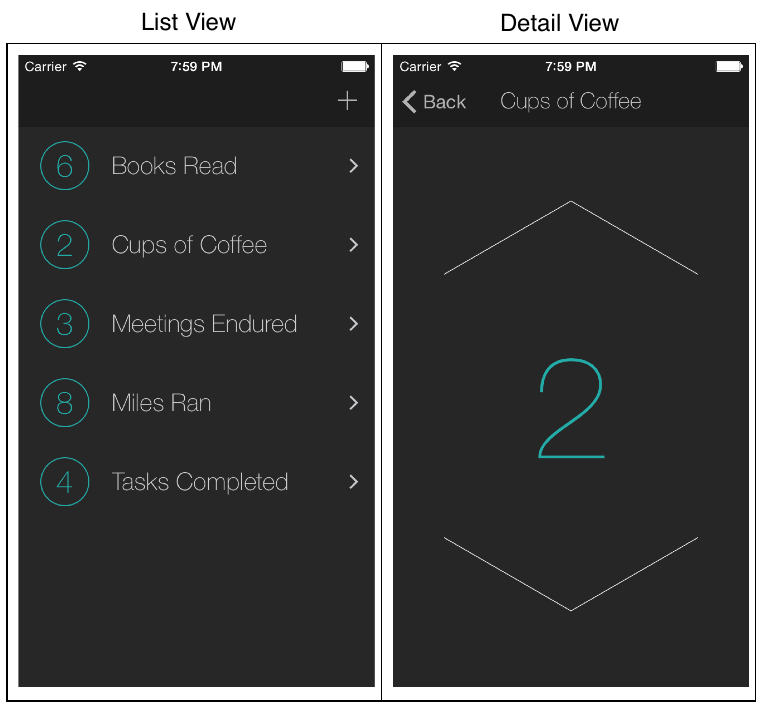
In this article, I’ll walk you through some of the basics of WatchKit using a simple sample application called Watch Counter. The app’s function is very simple: Users can keep track of a tally count of items in a list. For example, a user could create an item called “Cups of Coffee” and increment the count each time they finish a cup of coffee that day. The first thing you should know about Apple Watch development is that you can’t create a stand-alone watch app. The watch app must be packaged in with a full iPhone application. This shouldn’t come as too much of a surprise considering the fact that an Apple Watch needs to be paired with an iPhone in order to function anyway. I’ve gone ahead and created the Watch Counter iPhone app. There are a grand total of two screens which are shown below. The list view displays the list of items and allows the user to add a new item. On the detail view, the user can increment or decrement the count.
Configuring the Xcode Project
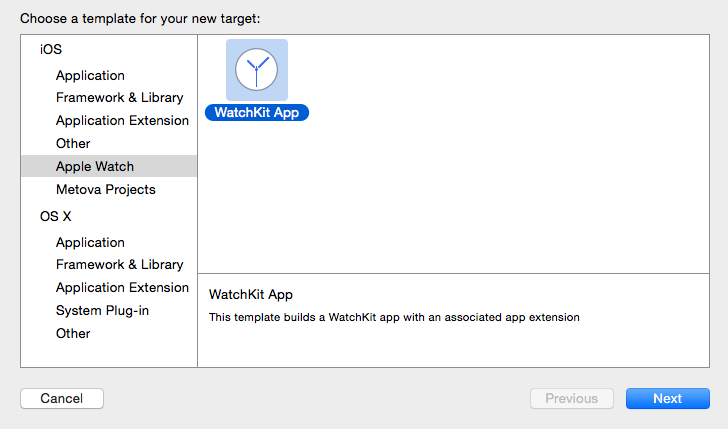
In order to add a WatchKit app to the project, we need to create two new targets–a WatchKit App and a WatchKit Extension. To create the new targets, go to File > New > Target, select “Apple Watch” in the left pane, choose the “WatchKit App” template, and click Next.
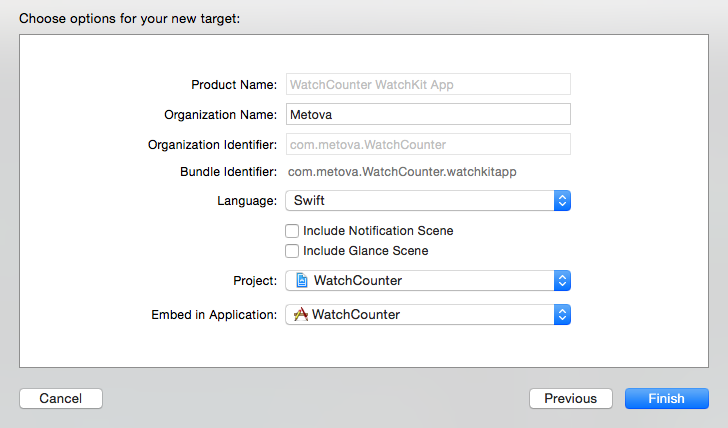
From here, you’ll see the options screen for the new target. There are two checkboxes titled “Include Notification Scene” and “Include Glance Scene.” For this article, I won’t be covering notifications and glances, so I’ve left these unchecked.
In the project navigator, you’ll notice that there is a new group for each of the two new targets. One is titled “WatchCounter WatchKit Extension” and the other is “WatchCounter WatchKit App.”
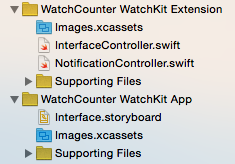
So, why do we need two new targets when we’re only creating one Apple Watch app? This may seem surprising, but as we look at the architecture of Apple Watch apps, it will become more clear.
WatchKit App Architecture
The reason why there are two targets is because half of the app resides on the watch and the other half resides on the phone, as shown in the diagram below. 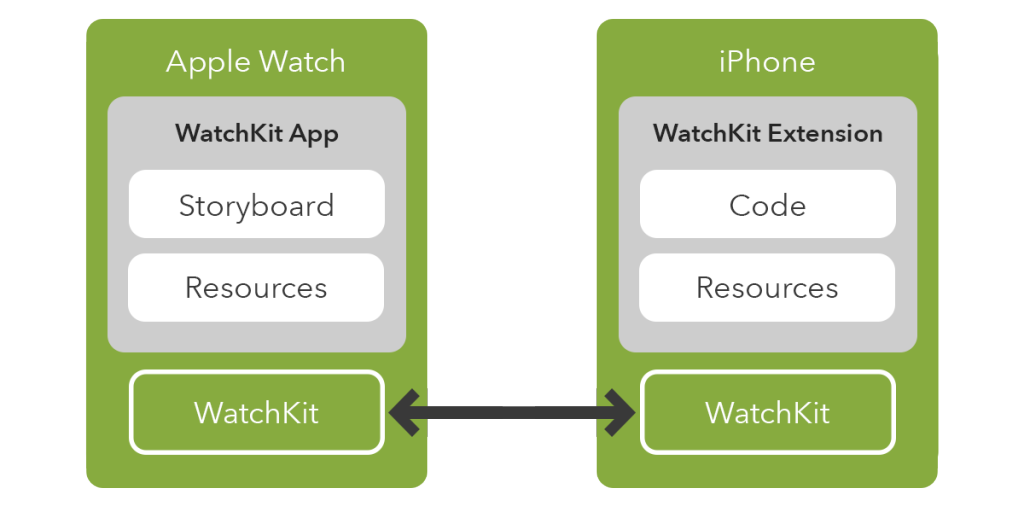
WatchKit App
The WatchKit App target resides on the watch itself. Its only contents include a storyboard for laying out the interface and other resources such as images. No code is included in this target, and yes, you have to use storyboards.
WatchKit Extension
The WatchKit Extension target runs on the phone. The extension includes the code for controlling the storyboard scenes and manipulating model data. All communication between the WatchKit App and the WatchKit Extension takes place over a Bluetooth LE connection. Fortunately, Apple has abstracted away all the necessary Bluetooth communication in the WatchKit SDK. Even though you don’t have to work with the Bluetooth connection directly, you still have to keep it in mind when writing your code. The transfer of data and events between your controllers and interfaces is no longer instantaneous.
The WatchKit Storyboard
Open up the Interface.storyboard file. At first, it looks just like a normal storyboard but with a smaller scene. However, it’s actually quite different. Let’s go ahead and lay out both the counter list view and the counter detail view. When you drag and drop a table from the object library into the interface controller, you are likely to be surprised. There is no freeform view hierarchy where interface elements can be positioned at exact coordinate positions–the table simply snaps into place. If we take a look at the attributes inspector for the table, we can see that there really aren’t many options.
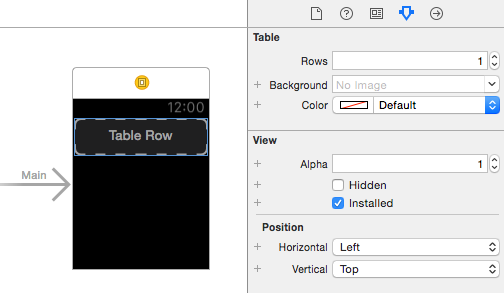
We can change the number of rows, set a background image or color, modify the alpha and hidden values, and change the basic positioning. You will come to find that tables, along with the other new WatchKit classes, are essentially much simpler versions of their UIKit counterparts. Inside the table, you’ll find a row controller with a “group” inside of it. In WatchKit, row controllers take on the role of cells in tables. The group object is an instance of WKInterfaceGroup. Groups are essentially container views. The contents within a group can be laid out horizontally or vertically. Groups can also be nested in order to lay out more complicated interfaces.
Laying out the cells
In order to make our row look similar to the rows in the iPhone app, we’ll need to drag two labels into the group. One label will display the count while the other will display the title. The first thing we need to do is position the labels so that they are vertically centered. We can accomplish this by setting the vertical position to “Center”.
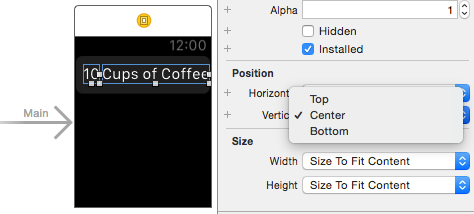
Next, we need to specify how much horizontal space each label gets to occupy. We can do this by setting the width properties to be “Relative to Container.” This option allows us to specify the width of each label as a percentage of the width of the group they are contained in. I’ve chosen to use 20% for the count and 80% for the title.
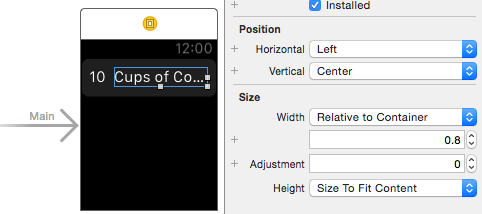
As you can see above, I’m already running into an issue. The short title “Cups of Coffee” doesn’t even have enough room to fit. This is a good time to reconsider the design. Perhaps the side-by-side layout used in the iPhone rows isn’t best suited for the watch’s smaller screen sizes. Let’s try stacking the labels vertically so they both have the full width to grow horizontally. We can accomplish this by changing the Layout on the group to “Vertical.”
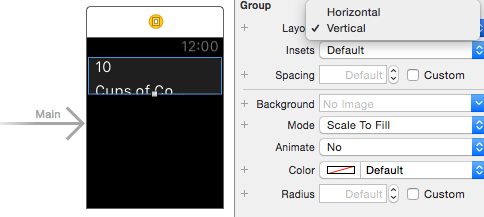
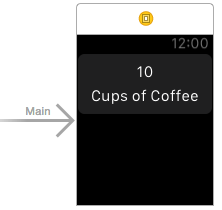
Now, we can set the group’s height to a fixed value of 60, change the relative widths of the labels to be 100%, and center the text.
Laying out the detail view
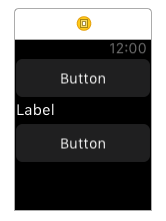 The detail view is a fairly simple view to lay out. It is composed of an increment button, a decrement button, and a label for the count. Start by dragging a new interface controller from the object library into the storyboard. Then add a button, a label, and another button.
In the attributes inspector, set the height of all three elements to be “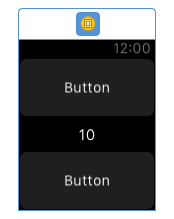 Relative to Container.” Then, set the button height values to be 0.4 for 40% each, and set the label height value to be 0.2 for 20%. Also, set the label’s width to be “Relative to Container” with a value of 1 for 100%.
WKInterfaceButton has a property for a background image which we 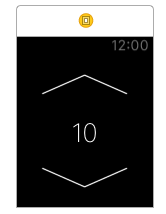 can use to display smaller versions of the increment/decrement arrows that the iPhone app has. The images will need to be added to the asset catalog for the WatchKit App target. Also, keep in mind that you won’t need any non-retina assets since both the 38mm and 42mm watches have retina displays. We can also increase the font size of the label since we have the space.
WKInterfaceController
In WatchKit apps, WKInterfaceController is analogous to UIViewController. It is used to control the interface and respond to user events. First, let’s look at the two methods we can use to first initialize our interface.
override init() { super.init() // Perform any basic initialization here}override func awakeWithContext(context: AnyObject?) { super.awakeWithContext(context) // Initialize the bulk of your UI here}
The init method is the designated initializer. This is the first opportunity to perform any necessary initialization. Unlike view controllers, after super.init() is called, outlets to interface elements in the storyboard are initialized. However, Apple still recommends performing your UI initialization in the awakeWithContext method. The awakeWithContext method has one parameter titled “context.” When presenting a new interface controller, the context parameter provides a simple way to perform dependency injection. This can be any type of object you want. The other two lifecyle methods are willActivate and didDeactivate:
override func willActivate() { super.willActivate()}override func didDeactivate() { super.didDeactivate()}
The willActivate method is essentially the equivalent of UIViewController’s viewWillAppear method. It is called when the interface is about to be displayed. Use this method to perform updates to your UI for any data that has changed. The didDeactivate method is similar to viewDidDisappear with one important difference: The interface controller could be deallocated at any time after didDeactivate is called. Use this method as an opportunity to perform any cleanup you may require such as saving state information or invalidating timers.
Sharing Data with the iPhone App
In order to populate our table, we need access to the Counter model objects used in the iPhone app. The problem is, the WatchKit extension runs a separate process from the main app and it is a separate sandbox. The solution is to use a shared app group. App groups provide a secure container that different apps can access. This allows you to share files and NSUserDefaults. You can create an app group in the Apple developer portal, and then add them using the “Capabilities” tab of the target settings.

You’ll need to add this capability for your WatchKit extension as well as your main target. Once this is setup, you can access the shared directory using NSFileManager:
let url = NSFileManager.defaultManager().containerURLForSecurityApplicationGroupIdentifier("group.com.metova.WatchCounter")
Alternatively, you can access the app group’s user defaults:
var sharedGroupDefaults = NSUserDefaults(suiteName: "group.com.metova.WatchCounter")
In this case, the WatchCounter app is using Core Data. In order to share the database across the applications, we will need to place the persistent store in the shared group directory. Once we do that, both applications can access the database file.
Sharing Code with the iPhone App
Now that we’ve set up the shared app group, both applications can access the database file. However, we still have a problem. We want our model classes and Core Data utility classes to be available to both apps. In order to do this, we can create an embedded dynamic framework that is shared by both apps. We can create the framework by going to File > New > Target, select Framework & Library in the left pane, choose Cocoa Touch Framework, and hit Next.
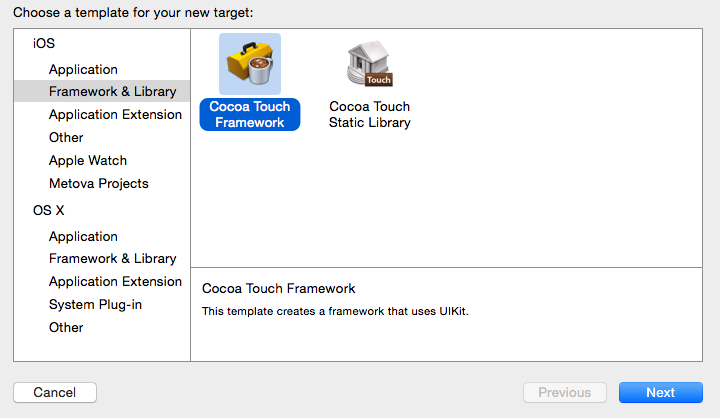
Now we can move our model classes and Core Data utility classes to the framework target and use the framework in both apps. Be mindful of access control. By default, everything in Swift has an “internal access” level. It is essentially public within that module, but private outside of the module. In order to use classes and methods from another module, you’ll need to declare them as public.
Populating the Table
In order to access the table, you’ll need to hook up an outlet. In order to access the labels in the row, you’ll need to create a row controller and hook up the outlets. A row controller is simply an NSObject subclass:
class CounterRowController: NSObject { @IBOutlet weak var countLabel: WKInterfaceLabel! @IBOutlet weak var counterTitleLabel: WKInterfaceLabel!}
In order to populate the table, we simply loop through our model objects and set up the rows. That’s right–there is no delegate or datasource involved. We do this in the awakeWithContext method:
var dm = DataManager.sharedInstanceself.counters = dm.fetchCountersWithContext(dm.mainContext!)self.table.setNumberOfRows(count(self.counters), withRowType: "CounterRow")for (index, counter) in enumerate(self.counters) { var row: CounterRowController = self.table.rowControllerAtIndex(index) as! CounterRowController row.counterTitleLabel.setText(counter.title) row.countLabel.setText(counter.count.stringValue)}
Presenting the Detail Interface
Next, we’ll want to display the detail view when the user taps on a row in the table. Create a new WKInterfaceController subclass to control the detail interface. In the storyboard, set up a push segue from the row to the detail view. When we push the detail interface, we’ll need to pass the Counter object to it somehow. This is where the context parameter of awakeWithContext comes into play. In order to pass the Counter to the detail interface, we can override contextForSegueWithIdentifier in the list controller:
override func contextForSegueWithIdentifier(segueIdentifier: String, inTable table: WKInterfaceTable, rowIndex: Int) -> AnyObject? { return self.counters[rowIndex]}
Now, in the detail controller, we can setup the UI using the Counter object:
override func awakeWithContext(context: AnyObject?) { super.awakeWithContext(context) self.counter = context as? Counter if let counter = self.counter { self.countLabel.setText(counter.count.stringValue) }}
From here, all that’s left to do is hook up the increment and decrement button actions:
@IBAction func incrementButtonTapped() { if let counter = self.counter { counter.count = NSNumber(integer: counter.count.integerValue + 1) self.countLabel.setText(counter.count.stringValue) DataManager.sharedInstance.persist(synchronously: false) }}@IBAction func decrementButtonTapped() { if let counter = self.counter { counter.count = NSNumber(integer: counter.count.integerValue - 1) self.countLabel.setText(counter.count.stringValue) DataManager.sharedInstance.persist(synchronously: false) }}
Updating the List Interface
If the user increments or decrements the count on the detail screen, we’ll need to update the count label for that row when we return to the list interface. This is a good opportunity to use the willActivate method. Add a property to keep track of index for the selected row, and update the row in willActivate:
override func willActivate() { super.willActivate() if let row = self.selectedRow { var counter = self.counters[row] var row: CounterRowController = self.table.rowControllerAtIndex(row) as! CounterRowController row.countLabel.setText(counter.count.stringValue) self.selectedRow = nil }}
The Final Product
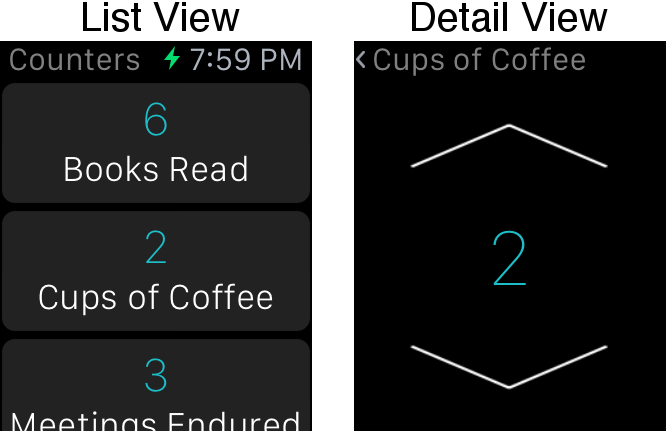
To run the WatchKit app, use the “WatchCounter WatchKit App” scheme. Until the Apple Watch becomes available (or if you just happen to not have one on you), there is a great third party iPhone application called WatchSim. You can use it to display your watch simulator screen onto your iPhone at the actual retina size. The app allows you to get a true perspective of the size and feel of your UI. It even allows you to interact with the simulator through the Apple Watch screen on your phone.
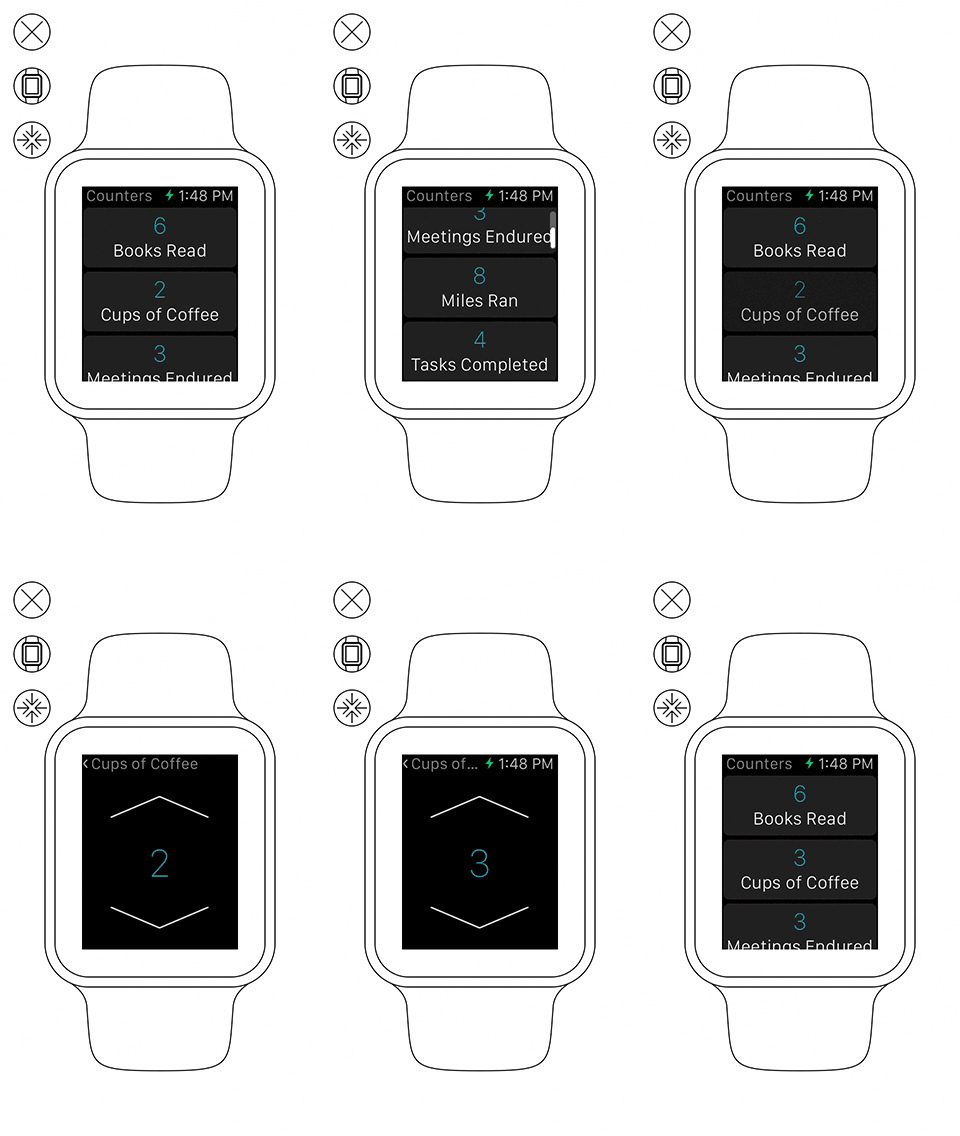
Watch Counter in action on WatchSim
A Quick Note on Notifications and Glances
Glances are screens accessed by swiping up from the bottom of the watch face. If you implement a glance for your app, you should display the most important information that the user might want to be able to see quickly. Glances are read-only non-scrollable screens. If the user taps on the glance, it will take them to the app.
If your app supports push notifications, the notifications will be received on the watch even if you don’t implement a custom notification screen. Custom notification screens, however, can include more content as well as custom action buttons that can send events to your watch app or iPhone app.
Quick Tips
- Include a settings bundle in your app so users can control app settings from within the Apple Watch app on the iPhone.
- Communication between the WatchKit app and the iPhone requires sending data back and forth via Bluetooth. Minimizing traffic between the devices will result in a substantially faster user experience.
- When asking the iPhone app to perform a longer running asynchronous task using the openParentApplication:reply: method, start a background task on the iPhone app to ensure that the app doesn’t get suspended before sending its reply back to the WatchKit app.


